Welcome to the VICC-CP Wiki
General Thoughts
There are five types of users in the VICC-CP:
- Superuser
- Standard user
- Read only user
- Anonymous user
- Account manager
The account manager is a special role which allows the user to create and modify user data. It is very easy to differentiate external links from internal ones:
The workflow
Insert variants
Variants can be inserted from the create variant page.
The VICC-CP allows to insert variants manually, from HGVS, VCF file or TSV. The TSV import will ignore any lines starting with '#'. And the format of the TSV
is be chromosome "tabulator" genomic start "tabulator" genomic end "tabulator" reference sequence "tabulator" alternative sequence.
New variants are automatically added to the annotation queue and will be processed once a worker is ready to process it. The status of the annotation can
be seen when navigation to the variant details page.
Browse variants
To find the variant you are looking for navigate to the search variants page. This page shows a paginated
table of all variants. Note that the HGVS c. and HGVS p. columns are dependent on the transcript. Thus, these two columns show the HGVS strings of the
preferred transcript (MANE -> longest coding -> longest non coding). If the variant is contained within more than one gene all of the HGVS strings from
the preferred transcripts of all genes are shown. The "Your classification" shows your most recent user classification for this variant.
To filter the table of all variants click the
-button to the top right. The search is explained in more detail here
It is also possible to add all variants which satisfy the current filtering criteria to a user defined list by clicking the "Add to list" button located at
the bottom left. To create a new list go here.
Clicking on any of the rows will get you to its variant details page.
The variant details page
This page displays all annotations of a variant. The top headline shows the variant and its most recent HediVar consensus classification. There are six types of consensus classifications:
- -: no classification
- 1: benign
- 2: likely benign
- 3: uncertain
- 4: likely oncogenic
- 5: oncogenic
The main body of the page displays visualizations, classifications and annotations which are organized in multiple tabs. The tabs contain the following information:
- Classification: VICC-CP consensus classification, VICC-CP user classifications, ClinVar classifications, BRCA exchange and ARUP BRCA classifications
- Population & in-silico annotations: phylop-100way, cadd scaled, revel, spliceai, maxentscan, gnomAD, cancerhotspots, tp53db, VEST4, FATHMM-XF, CHASMplus
- Gene annotations: NCG7.0 oncogenicity scores, GnomAD oe
- OncoKB: biological function, clinical implication
- Consequence: The variant consequences with associated HGVS strings and protein domains
- Literature: Papers annotated by VEP, TP53db and litvar2
- IGV: The IGV genome browser. The first track shows the variant itself. The second track shows all classified variants (click on them to find a link to the variant details page). The third track shows the ensembl transcripts. Red transcripts are MANE select or MANE plus clinical transcripts, orange ones are ensembl canonical and dark blue ones are gencode basic transcripts. Other transcripts which do not satisfy the aforementioned criteria are not shown.
User classification
To classify a variant click the
-button on the variant details page and select "Classify". On the classify variant page you can first select if you want to insert a user
classification or a consensus classification. However, only superusers can insert consensus classifications. Next, select the cancertype you wish to classify this variant for. You may choose
to classify the variant for no specific cancertype. In this case select "Pan cancer (NULL)". The presented cancertypes (except for "Pan cancer") originate from the oncotree ontology for cancertypes
(visit the official website of oncotree here). The website will automatically select "Pan cancer" if you did not classify the variant yet. If you already
have a classification for this variant the website will try to choose the best cancertype.
To select a criterion follow these steps:
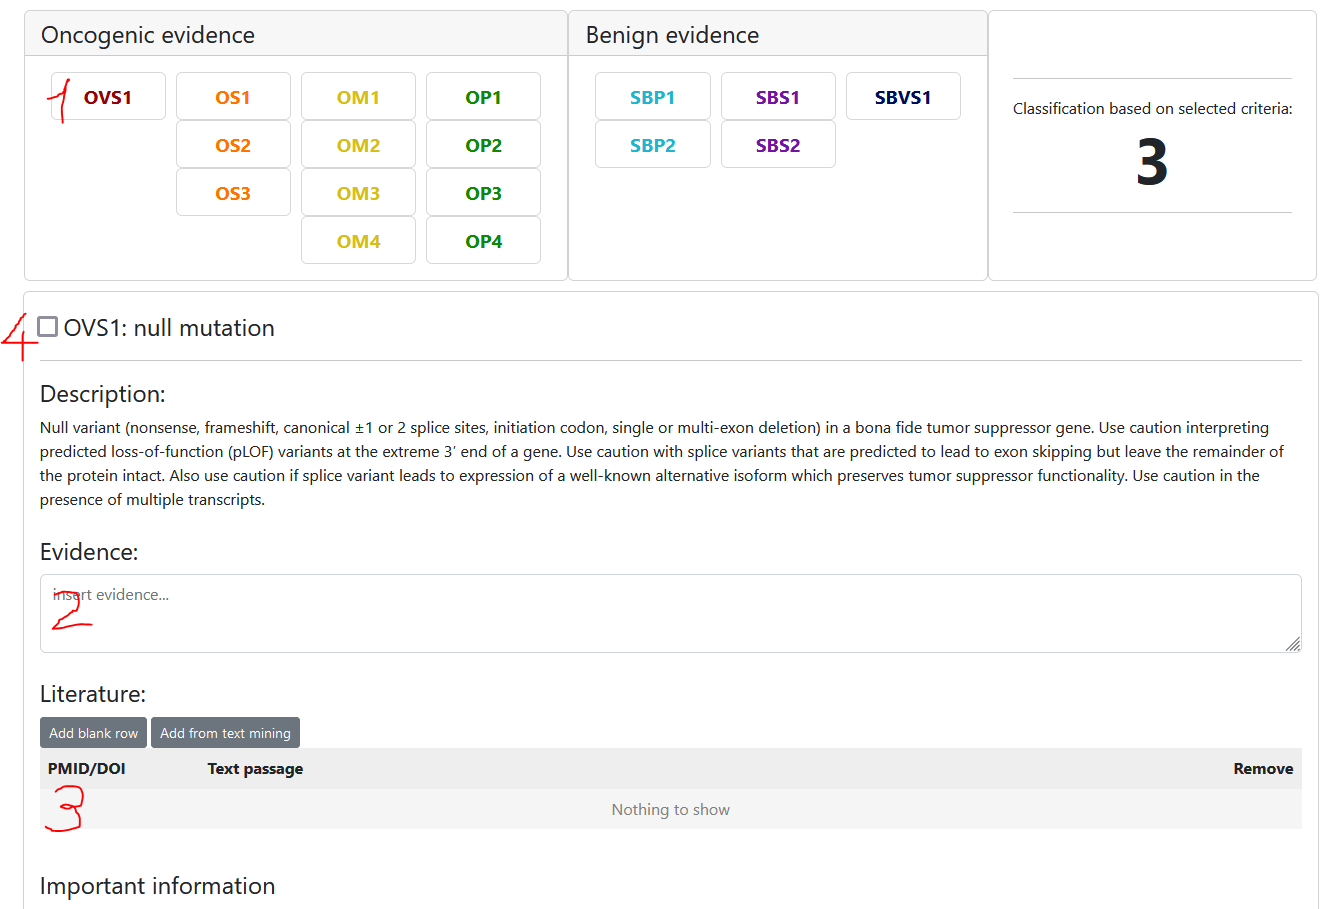
- Select the criterion
- Insert evidence (eg. use the information provided in the "Important information" section)
- Optional: insert literature (you may insert PMIDs, DOIs or choose from the provided list of papers)
- Select the criterion state
- unchecked: we do not have enough evidence to say anything about this criterion -> not assessed / unknown evidence
- selected: evidence suggests this criterion is true -> assessed / true evidence
- unselected: evidence suggests this criterion should not be selected -> we KNOW that this criterion is not selected because of evidence -> Use this for documentation purposes
The classification preview to the right will update automatically based on the selected criteria.
Note that each user can only have one user classification per variant and scheme, but they can be edited anytime.
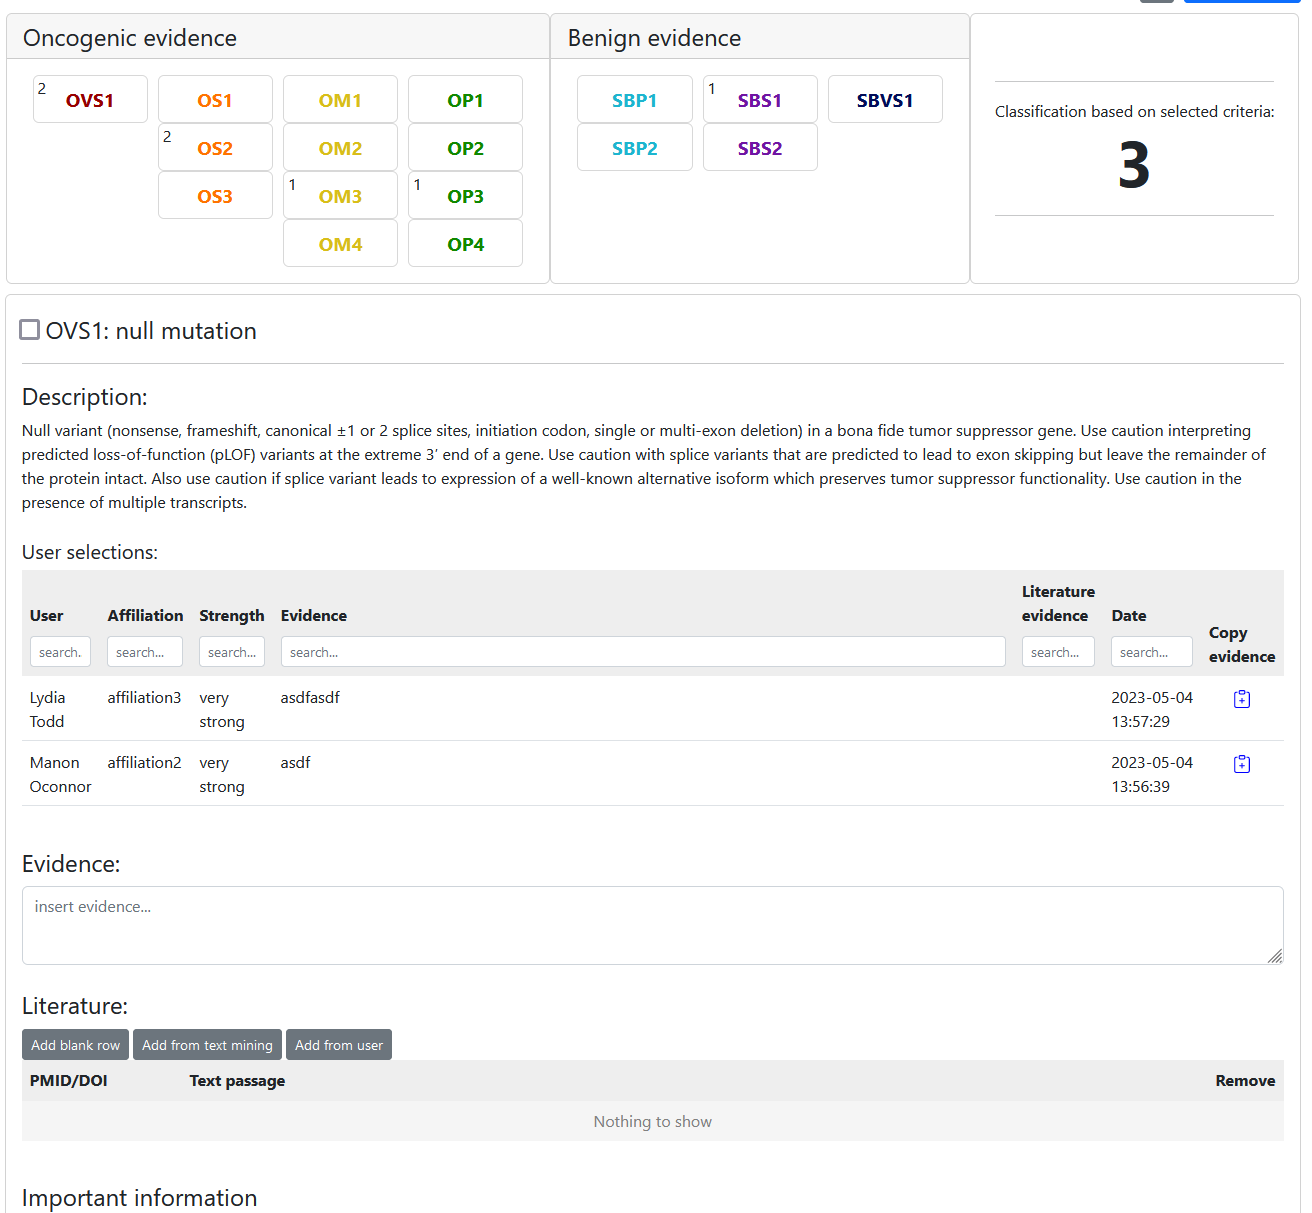
Consensus classification
To classify a variant click the -button on the variant details page and select "Classify". On the classify variant page you can first select if you want to insert a user classification or a consensus classification. Consensus classifications work very similar to user classifications. The only difference is that the number of users who selected a criterion is displayed next to the criterion like so:
Automatic classification
The classify variant page also provides help to choose some criteria. Simply use the "preselect criteria" button. Options, like the transcript of interest and the computational evidence scores to consider for OP1 and SBP1 can be adjusted. The "choose best transcript automatically" option will select the MANE transcript and if that gene does not have a MANE transcript it will choose the longest coding. If there are no coding transcripts it will choose the longest non-coding transcript. It is very important to check every preselected criterion and accept or reject the decision of the algorithm. Also, OS3, OM1, OM4 and OP2 can not be selected automatically. Details about the automatic classification algorithm:
-
OVS1 (null mutation):
is ncg tsg AND mutation class: stop gained, frameshift, splice or startcodon -
OS1 (known oncogenic variant):
cmc mutation significance 1-3 OR variant that causes the same amino acid change and is classified as (likely) pathogenic in ClinVar -
OS3 (strong cancerhotspot):
Cancerhotspot total (AC) >= 50 AND Cancerhotspot alt (number of occurances) >= 10 -
OM2 (protein length change):
is ncg oncogene or tsg AND variant class: inframe insertion/deletion -
OM3 (intermediate cancer hotspot):
Cancerhotspot total less than 50 AND Cancerhotspot alt >= 10 -
OM4 (alternate missense variant):
Another missense variant in the same codon with Grantham distance >= Grantham distance of observed amino acid change and classified as (likely) pathogenic in ClinVar -
OP1 (computational evidence):
Depending on which scores you choose:
Revel > 0.5 AND CADD > 20 AND FATHMM-XF < -1.5 AND CHASM < 0.05 (p-value) AND VEST4 < 0.05 (p-value) -
OP2 (genetic etiology):
not preselected -
OP3 (weak cancer hotspot):
0 < Cancerhotspot alt count < 10 -
OP4 (absent from controls):
gnomAD AF < 0.001 -
SBVS1 (high minor AF):
gnomad > 0.05 -
SBS1 (intermediate minor AF):
0.05 <= gnomad > 0.01 -
SBS2 (appears in functional studies):
clinvar class 1 or 2 (interpretation summary) -
SBP1 (computational evidence):
Depending on which scores you choose:
Revel <= 0.5 AND CADD <= 20 AND FATHMM-XF >= -1.5 AND CHASM >= 0.05 (p-value) AND VEST4 >= 0.05 (p-value) -
SBP2 (synonymes and high oe scores):
mutation class synonymous AND oe_syn > 0.1
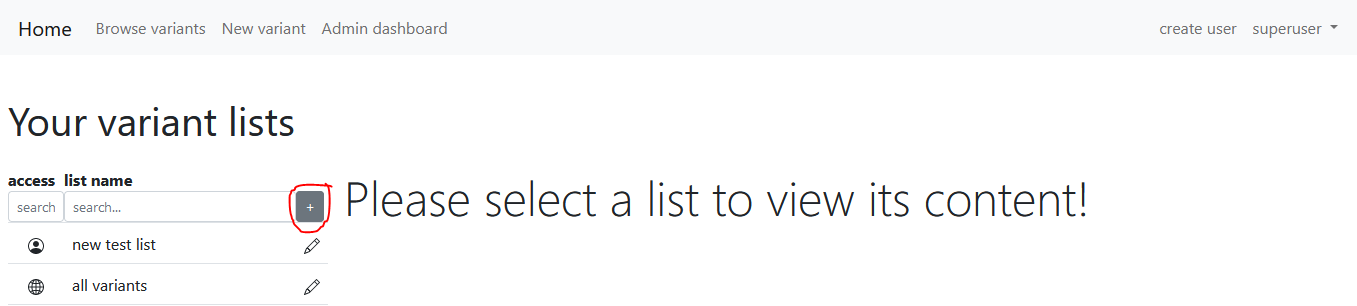
User variant lists
Each registered user can add new variant lists here. Click the "+" button:
There are two ways to insert variants to the newly created variant list. The first one is to navigate to the browse variants page, search for variants and click the "Add all to list" button at the bottom left of this page. This will insert all variants satisfying the criteria of the current search.
The second possibility to add variants to a list on a one-by-one basis is to navigate to the variant details page, click the -button and select "Add to list".
All variants collected in these ways are displayed when clicked on the name of the variant at the user lists page. The table of variants behaves exactly the same as the one shown on the browse variants page. It can be filtered and when a row is clicked it takes you to the variant details page.
It is also possible to export all variants in one of the lists to vcf by clicking the "Export to VCF" button on the bottom of the page.
If you want to change the properties or delete a list that was created by you. Just click the little pencil button next to the list name. Beware that private lists can not be seen by other users.
Download data
Registered users are able to download a vcf file for one variant through the respective variant details page by clicking the gear button and selecting "Export to VCF". This file will contain all information that are available
for this variant. Including all annotations and classifications.
If a registered user wants to download more than one variant in a single file they have to collect relevant variants in a user defined list (see previous section on how to create one). Then, simply click the "Export list to VCF"
button at the bottom right of the list details page.
In rare cases ClinVar submissions are missing although there is a ClinVar summary available. In such cases the clinvar_submissions info in the downloaded vcf file will be set to None. This is usually because of erroneous data hosted
by ClinVar and is often fixed by updating ClinVar.
In any case, downloaded VCF files are encoded using the url encoding (Wikipedia). Excluding whitespace, which is replaced with underscores "_". This ensures that the
file is machine readable and consistent when special characters that are also used as delimiters are used within the actual information. It is fast forward to revert the encoding once relevant information was read from the file.
Many programming languages support url decoding out of the box.
The downloaded VCF files from HerediVar always adhere to this delimiter order (please report if this is not the case):
- ;
- &
- |
- $
- +
User management
Create a new user
Only users with the "account_manager" role are allowed to create new users. There is no possibility to self-register in HerediVar.
An account manager can go here to create a new user account. Simply fill out the form which is presented
to you. Keep in mind that the username must be unique and can not be changed later. The mail address must be unique as well.
Upon submission Heredivar will automatically notify the user that about the newly created account using the provided e-mail. The new user will
recieve two mails: one with the username specified and one with an automatically generated initial password.
Change roles & disable users
An account manager can edit existing users by visiting this page. Simply select a user from the list
to edit its information. It is possible to disable users or change their roles from this page.
Keep in mind that changeing the e-mail will require the user to verify the mail upon next login.
Change password
Every user can change their own password by visiting this page. This will redirect to the keycloak account management console. First click the Update-button:
